OK so here we go with the tutorial for the granny ripple crochet stitch. Sorry it took so long to load up, the time just flies when we are all home on school holidays.
Step 1 - Making the chain
You will need to make a crochet chain in multiples of 11 until the project is as wide as you would like it to be and then add three more chains to the end. I also like to do this in even numbers eg 22, 44, 66 etc as this will give you an up at the start and a down at the end. It just looks more balanced.
Step 2 - First cluster
You will then need to come in 5 chains and make your first double crochet in the next chain. Then repeat the double crochet 2 more times in the same chain so that there are 3 double crochets in the same chain. This will be referred to as a cluster.
Skip 2 chains and form another cluster in the 3rd chain.
Skip 2 chains and form another cluster in the 3rd chain.
Step 3 - Forming the first valley
Skip 5 chains and in the 6th chain make a cluster. This will form the valley or the down V shape pattern in the blanket.
Skip 2 chains and make cluster in the 3rd chain.
Skip 2 chains and make a cluster in the 3rd chain.

Step 4 - Forming the peak
Chain 3 and then form another cluster in the same chain. this increases the stitches and forms the peak or the up shape in the blanket.
Skip 2 chains and form a cluster in the 3rd chain.
Skip 2 chains and form a cluster in the 3rd chain.

Step 5 - Forming the next valley
Skip 5 chains and make a cluster in the 6th chain. You will need to continue this pattern of peaks and valleys until you reach the end of you chain.

Step 6 - Starting the next row
Chain 5 and turn your work around to start the next row.

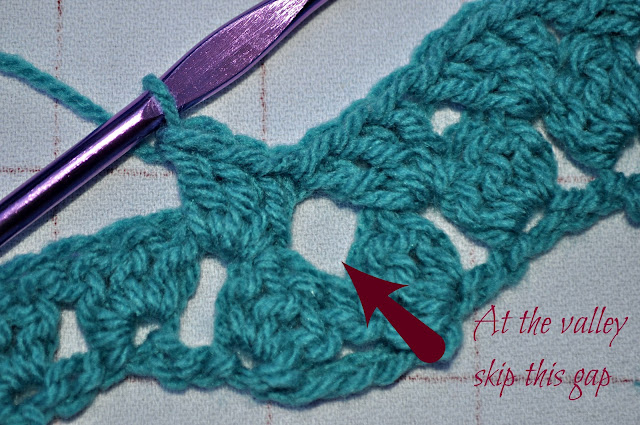
You need to make sure the are three cluster between each of the peaks and valleys. Depending on the amount of chain you have and how you finish your V you may need to skip a gap to form the valley at the start of the next row. See pic below.

Continue making clusters into each of the gaps until you reach a peak or valley.

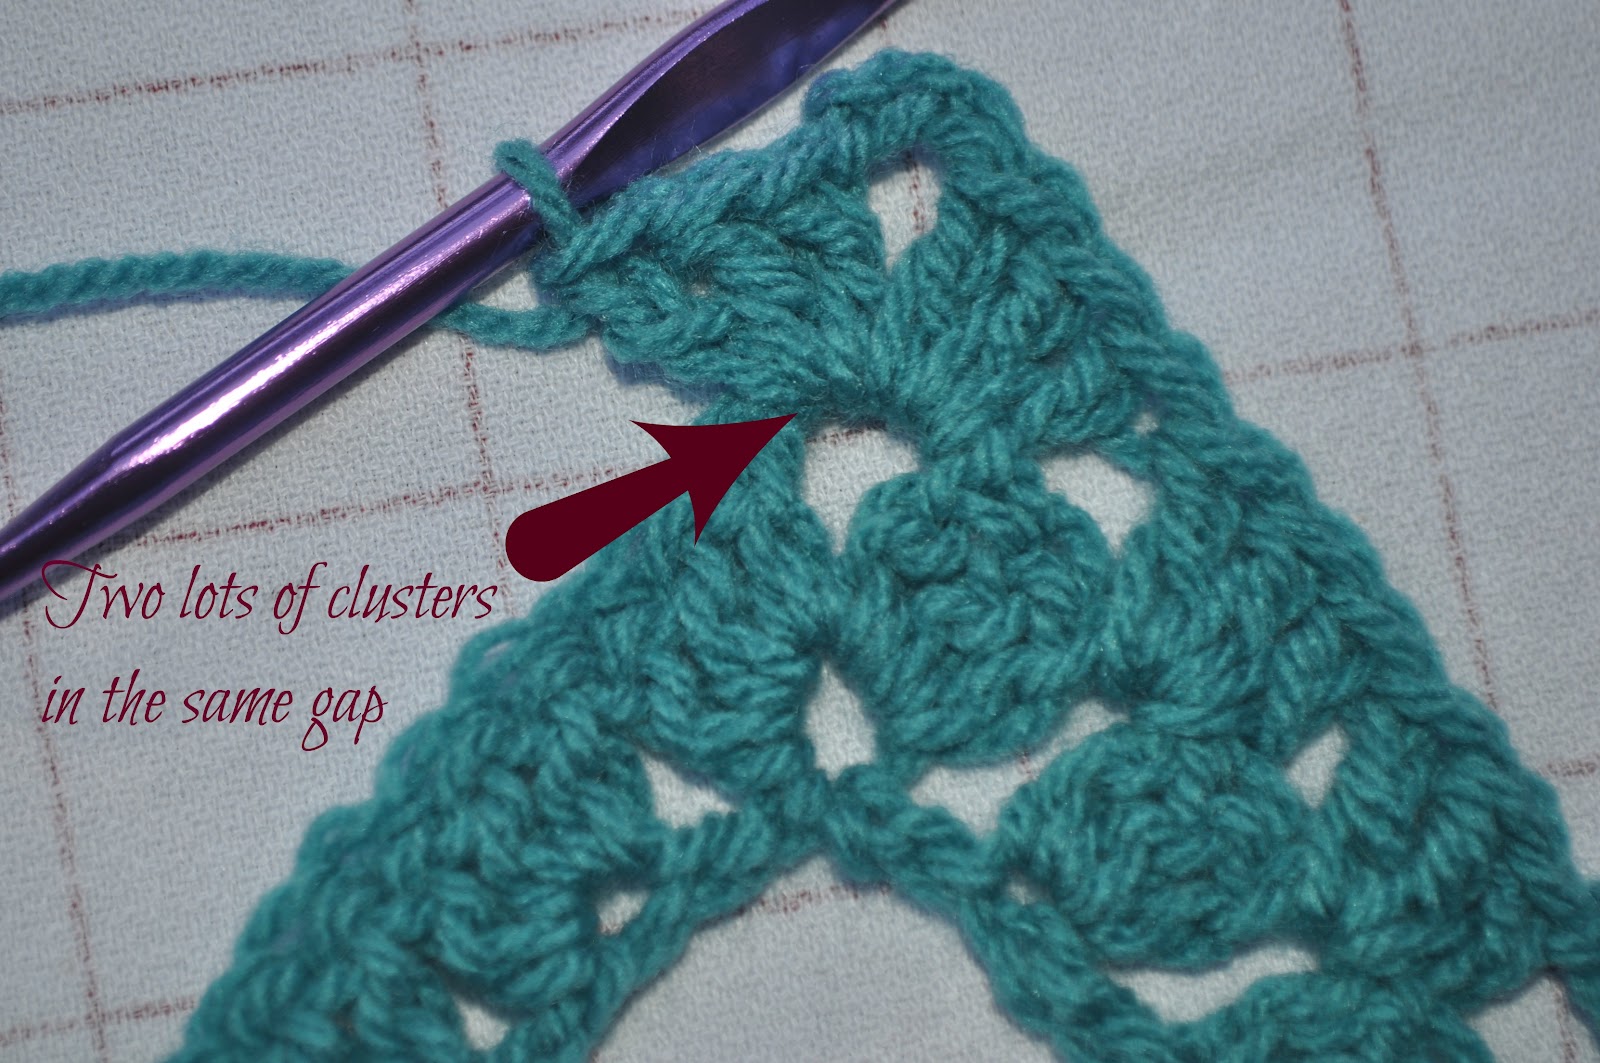
Forming the peak make a cluster chain 3 and then for another cluster into the same gap.


Continue making clusters into each of the gaps until you reach the next valley.
One you have formed the three cluster after the peak you need to skip the gap at the bottom of the valley and form a cluster in the next gap. This closes the pattern together to keep the V-shape.
Continue the pattern of forming peaks and valleys until you reach the end of the project.

Chain 5 and turn the work around to start the third row.

Continue this until you have reached the length you are after.
And 2 lots of clusters at the peaks.

When I first started I thought how is this going to form a straight edge at the sides. Well it just does. As your project grows the edges straighten up beautifully.
So give it a go it is actually alot easier than what you first think. I remember when I first saw it I pondered over it for ages thinking how it is done.
Feel free to ask any questions and happy Granny Ripple Crocheting....

Step 1 - Making the chain
You will need to make a crochet chain in multiples of 11 until the project is as wide as you would like it to be and then add three more chains to the end. I also like to do this in even numbers eg 22, 44, 66 etc as this will give you an up at the start and a down at the end. It just looks more balanced.
 |
| Chain in multiples of 11 |
You will then need to come in 5 chains and make your first double crochet in the next chain. Then repeat the double crochet 2 more times in the same chain so that there are 3 double crochets in the same chain. This will be referred to as a cluster.
 |
| The first cluster in the 6th chain |
 |
| You should now have 2 clusters |
 |
| You should now have 3 clusters along your chain. |
Skip 5 chains and in the 6th chain make a cluster. This will form the valley or the down V shape pattern in the blanket.
 |
| Skip 5 chains |
Skip 2 chains and make cluster in the 3rd chain.
 |
| You should now have 5 clusters along your chain |
Skip 2 chains and make a cluster in the 3rd chain.

Step 4 - Forming the peak
Chain 3 and then form another cluster in the same chain. this increases the stitches and forms the peak or the up shape in the blanket.
 |
| The peak |
 |
| You should now have 8 clusters along the chain |

Step 5 - Forming the next valley
Skip 5 chains and make a cluster in the 6th chain. You will need to continue this pattern of peaks and valleys until you reach the end of you chain.

Step 6 - Starting the next row
Chain 5 and turn your work around to start the next row.

You need to make sure the are three cluster between each of the peaks and valleys. Depending on the amount of chain you have and how you finish your V you may need to skip a gap to form the valley at the start of the next row. See pic below.

Continue making clusters into each of the gaps until you reach a peak or valley.

Forming the peak make a cluster chain 3 and then for another cluster into the same gap.


Continue making clusters into each of the gaps until you reach the next valley.
 |
| Make sure you have 3 cluster between the peak and the valley |
One you have formed the three cluster after the peak you need to skip the gap at the bottom of the valley and form a cluster in the next gap. This closes the pattern together to keep the V-shape.

Continue the pattern of forming peaks and valleys until you reach the end of the project.

Chain 5 and turn the work around to start the third row.

Continue this until you have reached the length you are after.
Don't forget to skip a gap at the valleys
 |

When I first started I thought how is this going to form a straight edge at the sides. Well it just does. As your project grows the edges straighten up beautifully.
So give it a go it is actually alot easier than what you first think. I remember when I first saw it I pondered over it for ages thinking how it is done.
Feel free to ask any questions and happy Granny Ripple Crocheting....

Grazie
ReplyDeleteun abbraccio e felice giorno
ty for this tutorial , i m about starting a crochet plaid and i had no clue how to make this ripple , following your blog now =)
ReplyDeleteLili